Shooting a Bar at Night Without Losing the Atmosphere
The camera has a peculiar talent for making a good night out look like a badly lit meeting. Lift every shadow, correct every warm light to white, sharpen every jacket, and the photograph becomes more legible while the evening quietly disappears. Photographing a bar at night calls for a different ambition: enough detail to carry the people and the place, enough darkness to remember why you stopped there. This photograph outside the English Empire pub is a useful example because it contains most of the problems at once. Bright lamps, dark coats, people moving at different distances, and several colours of light that have no intention of agreeing.
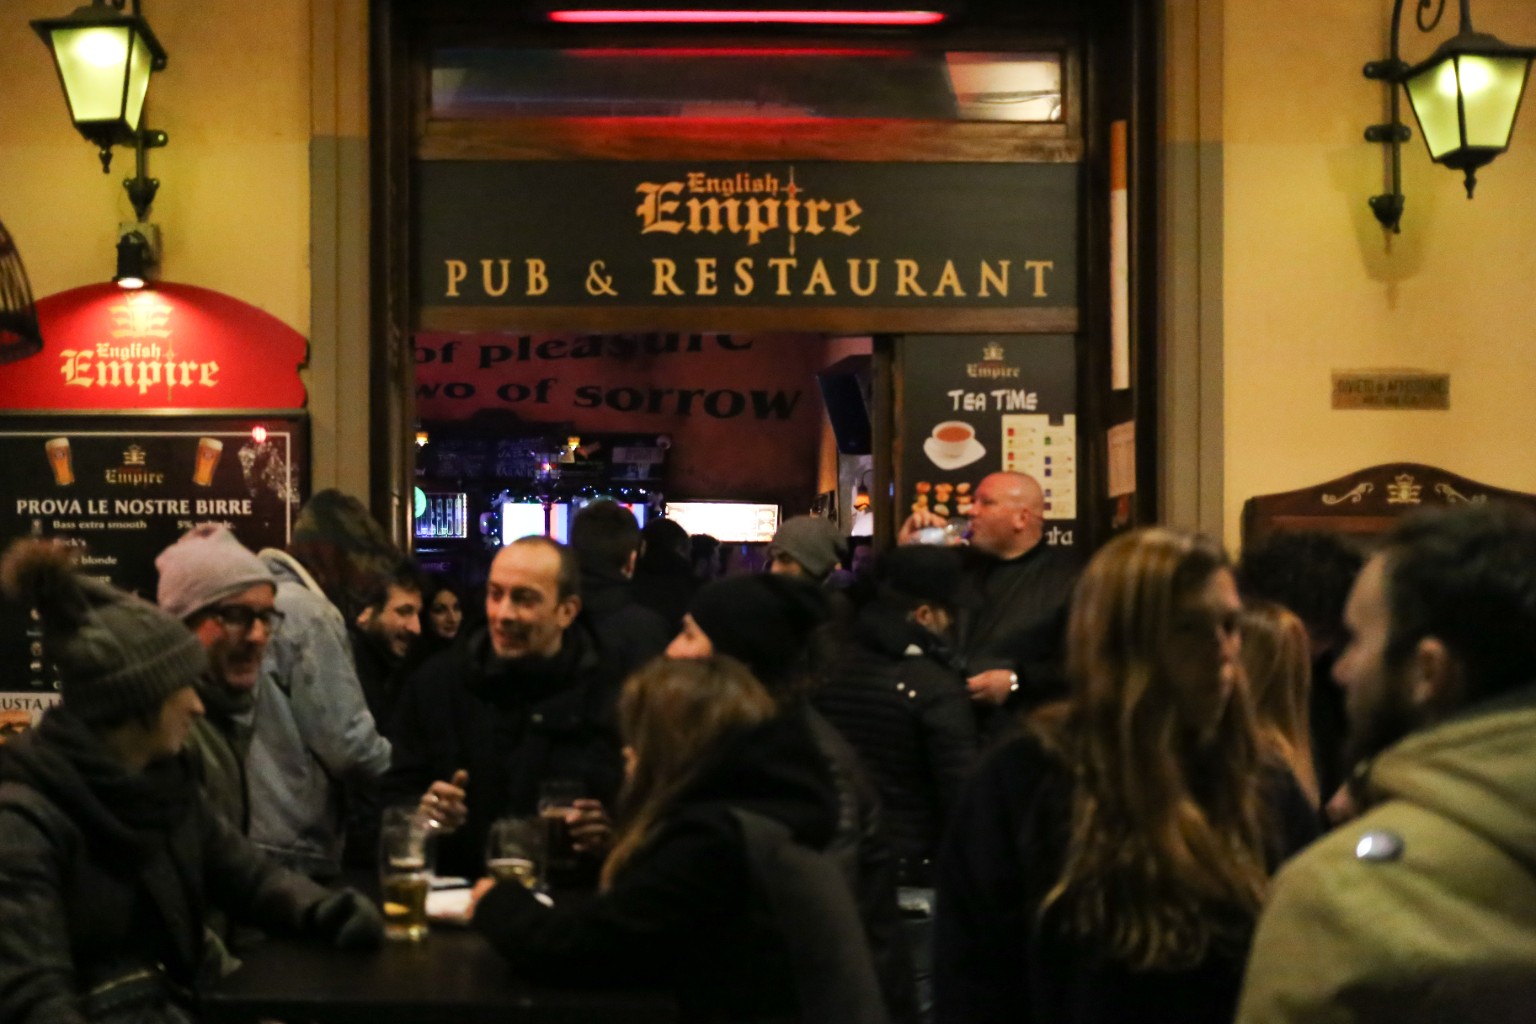
Photo credit: pxef.com.
The entrance gives the picture its structure. Two black wall lanterns sit high against the yellow facade, their pale centres glowing above a crowd in winter clothes. Between them, the gold lettering of the English Empire sign and the widely spaced PUB & RESTAURANT lettering establish the location, while a thin red light burns above the doorway. On the left, a red canopy and a beer advertisement repeat that colour lower in the frame. Through the entrance, small blue, violet and white lights suggest a deeper, darker interior. Then the people interrupt all that tidy architecture. A person in a grey knit cap and glasses leans into the group at the left, a man near the centre catches the warmer light on his face, and glasses of beer pick up little amber highlights on the dark table. A dark-haired figure seen from behind occupies the lower middle; at the right, long brown hair and a large olive-coloured jacket partly block the view. It is crowded, slightly untidy and visibly soft in places. Those qualities are part of its character, although softness is also something worth learning to control.
Start by deciding what needs to be sharp. A night scene containing people is governed by their movement as much as by your ability to hold a camera steady. Stabilization can help keep the pub sign still at a slow shutter speed, but it cannot stop someone turning towards a friend. For a comparable scene, I would begin around 1/125 second for relatively calm conversation and move towards 1/200 or 1/250 when gestures become lively. These are starting points, not the settings claimed for this photograph. Distance, focal length and the direction of movement all matter. If you deliberately want a little movement around a stable doorway, try a slower exposure and judge the result as an expressive choice. If your aim is a clear face, however, do not let the camera quietly drift down to 1/30 simply because the building looks steady.
A practical setup is manual exposure with Auto ISO: choose the shutter speed for the people and the aperture for the depth you need, then let ISO follow the changing light. Around f/2 to f/2.8 can be useful when the lens permits it, but a crowded scene is a poor place to assume that the widest aperture is automatically best. At close distances, f/1.2 or f/1.4 may leave one person clear and the friend beside them noticeably out of focus. A small group spread across several distances may justify f/2.8 or f/4 and a higher ISO. ISO 3200 or 6400 is a reasonable place to find yourself; the right limit depends on your camera and the size at which you will use the image. I would accept visible grain before sacrificing the expression to motion blur. Check that Auto ISO has not reached its ceiling and left the frame too dark.
Focus deserves its own decision, particularly when the nearest thing is somebody’s shoulder. In this frame, the large figure at the right and the dark head in the lower centre could easily distract automatic subject selection from the conversation beyond them. Use face or eye detection when it stays with your intended person, but switch to a smaller focus area when it keeps jumping to the foreground. Continuous autofocus helps with people swaying, leaning or turning, even when nobody seems to be going anywhere. Put the active area on a lit face at the distance that matters, take a short sequence, and check an enlarged frame. An apparently sharp sign above a soft face is a clue to investigate focus and movement separately; it does not, by itself, tell you which one went wrong.
Look for the useful light before asking the camera for more exposure. The people nearest the doorway receive a different mixture of light from those beneath the wall lamps or deeper in the crowd. A small change of position can put a face into a brighter patch without changing any setting. Watch for someone turning towards the entrance, or for a conversation shifting into the light. Expose so the important faces hold usable detail and check highlight warnings, especially on skin and illuminated lettering. A lamp’s tiny central bulb can reasonably clip. There is much less reason to sacrifice every face just to preserve it. Equally, increasing exposure until all the black coats become mid-grey will make the lamps and signs spread into featureless patches. Keep the shadows that give the brighter areas somewhere to stand.
Mixed colour is the other great trap. Here, yellow walls, warm skin, the red strip above the entrance and cooler interior lights all belong to the scene. No single white balance will neutralize them together. Shoot RAW if you want more freedom afterwards, then settle on a balance that keeps the principal faces believable while retaining the warmth of the facade. If a face has an unpleasant green cast, a restrained local correction is often more convincing than cooling the whole picture. Some coloured light should remain coloured. The red light above the door does not need to become white just because your editing software offers a slider.
Composition in a busy bar is often a matter of waiting for a gap rather than finding an empty view. The foreground bodies in this picture make the viewer feel close to the gathering, but they also compete with the people beyond. Move a little to one side, raise or lower the camera slightly, and watch how the overlaps change. Try to keep at least one readable exchange between people, with a visible face, gesture or glance that gives the crowd a centre of interest. Keep enough of the sign and doorway to explain the setting. A wider view tells the story of a place; a tighter view can tell the story of two friends. Neither improves merely because you manage to remove every obstruction. Sometimes the shoulder at the edge is what makes the photograph feel as though you were actually there.
I would begin with the available light for a scene like this. Direct flash would change the balance between the nearest jackets, the people farther away and the glowing entrance, and it would make the act of photographing much more conspicuous. Flash can work beautifully for a deliberately different look, but it is a decision about the picture’s character. Keep your movements considerate, avoid blocking the entrance or reaching across someone’s table, and respect a refusal. For a close portrait, a quick conversation is usually worth more than another minute pretending to photograph the sign. Inside a bar, ask staff if photography is welcome.
Back at the computer, resist giving the file a rescue operation it did not request. Adjust exposure around the important faces, recover useful highlights where possible, and lift shadows only until the scene reads comfortably. Apply noise reduction with restraint; waxy faces and smeared hair are a poor exchange for a cleaner background. Sharpen the areas that carry the picture, and accept that processing cannot truly restore a face blurred by movement or missed focus. The photograph here keeps its appeal through the layering of warm walls, red light, dark clothing, beer glasses and overlapping conversations. The technical aim for the next frame is to hold the important face a little more clearly while keeping all that evening around it. That is a better target than making the pub look as though someone turned on the office lights.